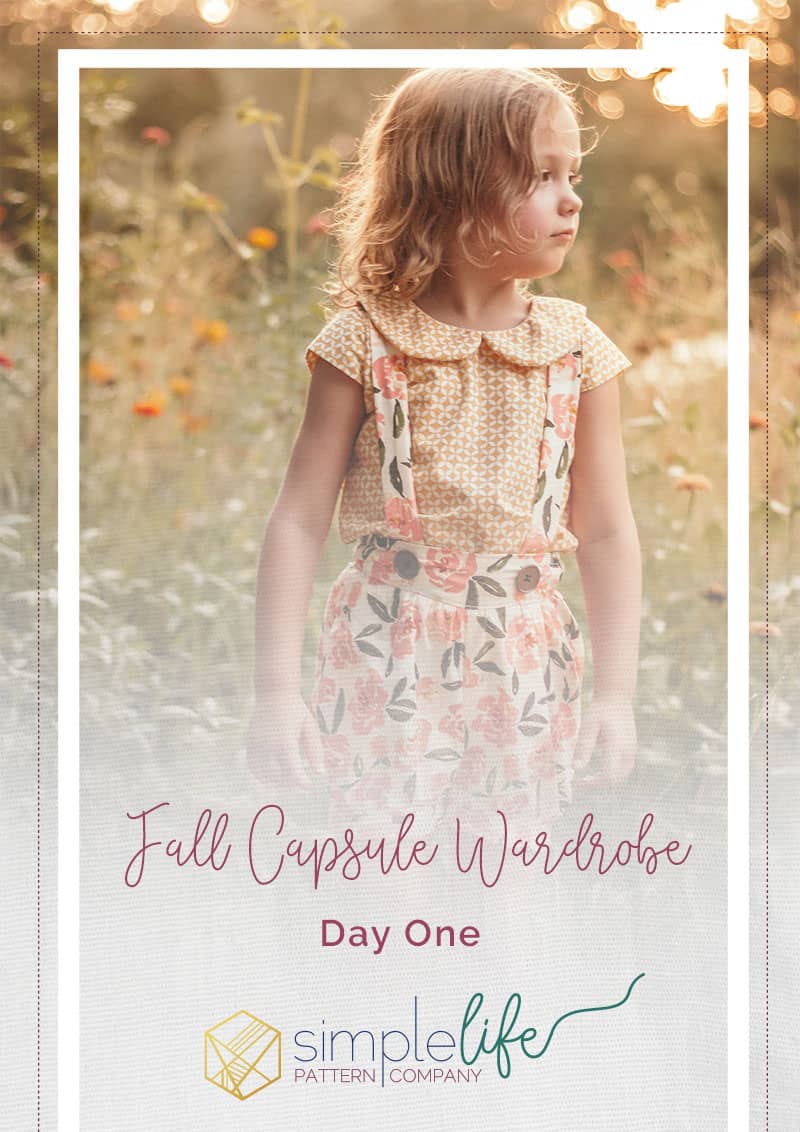
Fall Capsule Wardrobe: A Monthly Challenge DAY ONE
Hey everyone! I am extremely excited to be on the blog today to walk you all through how to make your very own Fall Capsule Wardrobe!
The Monthly Challenge
This month’s challenge is to plan and create a Fall Capsule Wardrobe. Here are the quick details:
- Create your own Fall Capsule Wardrobe with three tops, three bottoms, and three layers and/or accessories.
- Take flat lays of your finished pieces and put them in a Sudoku Square collage.
- Post your collage in the designated album on the SLPco Fan Group.
- The winning collages will be determined based on the number of likes (50%) and staff pick (50%)!
- Prizes:
- 1st Place: $30 in SLPco shop credit AND 3 yards of fabric from Art Gallery
- 2nd Place: $15 in SLPco shop credit and 1.5 yards of fabric from Art Gallery
- Contest Ends August 31, 2020.
I know what you are thinking, “I can’t do a capsule wardrobe!” or “Where do I even start?” Trust me when I say that I thought the same thing! Looking at the end result from the starting point can be overwhelming and may even seem impossible. Be assured that it is VERY POSSIBLE and actually quite easy to do as long as you take it one step at a time. Please join me this month as we create a fall capsule using SLPco patterns.
What is a Capsule Wardrobe?
A capsule wardrobe is a certain amount of tops, bottoms, and layers/ accessories that are made to be interchangeable with each other. The idea is to create multiple outfits with a minimal amount of pieces. This translates to less work and materials for you without sacrificing the cute handmade outfits. IT’S A WIN-WIN!
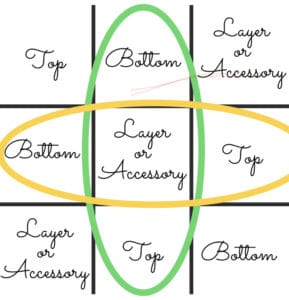
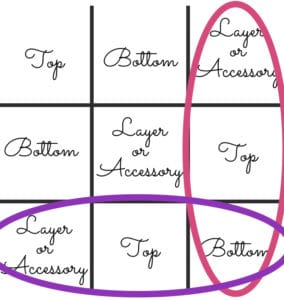
For our Fall Capsule Wardrobe, we are making nine pieces: three tops, three bottoms and three layers and/ or accessories. These nine pieces will result in six perfect outfits. Pictured below, you can see that we have each piece labeled within the Sudoku Square.

The goal is to have each square coordinate with it’s coordinating row AND column (see picture below as an example).
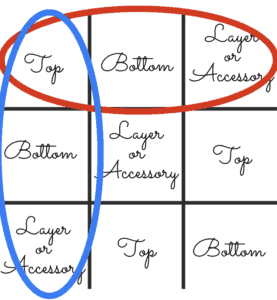
The ‘top’ that you put in the upper left hand corner needs to coordinate with the ‘bottom’ and ‘layer or accessory’ to the right as well as the ones below. The same holds true for each square as seen below.
How to Choose Coordinating Patterns
Choosing your patterns is such a fun step! Maybe you already know exactly which patterns you want to use. If that is the case, then YAY!! You are good to go for today and can come back tomorrow for the “How to Choose Coordinating Fabrics” part of the posts.
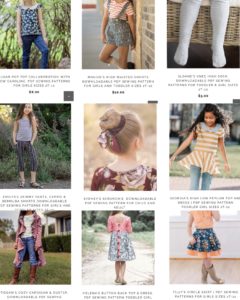
If you are like me, you may need to do some pattern shopping. Maybe you will choose to shop on the SLPco website, look through the SLPco patterns you already own, or a mixture of the two! Whichever you decide, I highly recommend taking notes of the patterns you are interested in using as you search. I chose to shop through the SLPco website and as I scrolled I took screenshots of the patterns that I was interested in using. Once I had all the patterns that inspired me for Fall, I started narrowing them down to three tops, three bottoms, and three layer/ accessory.
I knew for a fact that I wanted to incorporate the Maggie High Waisted Shorts in my capsule (I mean, how cute are they?!), and what goes better with suspender shorts than adorable knee socks? I put the Sloane Knee Socks in the adjacent accessory square. I then went back and looked through my screenshots to pick a top that would complete my outfit. Once I had the Sugar Pop Top selected, I revisited my screenshots to decide which other two patterns (top and layer/ accessory) I wanted to pair with Maggie. I continued the process of filling in the gaps, and before I knew it I had selected all nine patterns! I then moved the nine selected screenshots to an album on my phone that I labeled “SLPco Capsule Blog.” This helped me stay organized and helped me keep all my capsule pictures in one place.
The next step I did is completely optional. I am a visual person, so to help me “see” my capsule I created a collage of the patterns I selected. I put each screenshot in the slot that I wanted them to go on my Sudoku Square. Like I said, this step is completely up to you, but it really helped me see how everything would look together!
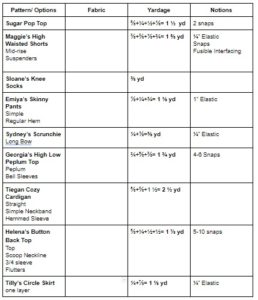
The patterns I selected:
Sugar Pop Top
Sloane’s Knee High Socks (Baby Sloane)
Sydney’s Scrunchie (this pattern is free if you are apart of our Facebook group!)
Helena’s Button Back Top (Baby Helena)
After selecting the patterns, I went through the options for each pattern and selected the ones I wanted. For example, Maggie’s High Waisted Shorts can either be high-rise, mid-rise, or low-rise AND wide leg, bubble with a cuff, or bubble with elastic AND suspenders or no suspenders. I went through and made note of which options I wanted for each pattern and wrote down the fabric requirements accordingly. To help stay organized, I made a table in a Google document where I had four columns: Pattern/ Options, Fabric, Fabric Requirements, and Notions. I filled the columns out as I went. This can be done by writing it down as well. As a SAHM to four kiddos, loose pieces of paper and notebooks often go missing. Compiling my list digitally and saving as I go was a necessity!
I cannot wait to see which patterns you all select! Join me tomorrow as I show you a simple and stress free way to pick out your coordinating fabrics!
Enjoy!
Kristen