Taking Better Photos
Hi everybody! Gail here from Little Pink Pumpkin.
As sewists/seamstresses/creatives we love to make beautiful things. We head to the store, pick out beautiful expensive fabrics and trims, spend hours printing/cutting/taping our patterns and sewing our garments together. Excitedly we try them on our children and it is stunning! We snap some photos, everything looks great on the back of the camera, upload to the computer and bam. We are struck with the intense feeling of disappointment. The pictures we’ve taken just do not give our creations justice. Nothing is worse then spending all of that time making our beautiful creations and not being able to capture them properly on camera.
This is where I come in. Now, I am not a photographer by trade. I have not been formally trained in photography. However, in my two years of testing patterns for SLPco I have picked up quite a few tips along the way. So, if you would like to learn how to take better photos, keep on reading!
Lighting
Above all, lighting is THE most important factor in the quality of your photos. Natural light will be your best source for good light. Outdoor photos are the easiest way to take advantage of the natural light but I understand that this isn’t always possible. So let’s discuss the different ways that we can take advantage of the light outdoors vs indoors.
Outdoor
When taking outdoor photos there are good times to take the photos, and bad times. There is something called Golden Hour which is the period of time shortly after sunrise and just before sunset. During this time the daylight is “warmer” and “softer” than when the sun is higher in the sky. Taking photos in harsh light IS possible, however, it is much more difficult to get a properly lit photo. When taking photos in direct sunlight, take photos with the sun BEHIND your subject or partially behind your subject. This can create a pretty haze over your image and there won’t be shadows across half of your subjects face. Another option for taking photos in direct sunlight is to find a nice shaded area. However, beware of dappled light. Dappled light happens when the sunlight is filtered through the leaves of trees. Think of the “spotty” light that you see under trees on the ground, this is dappled light. You don’t want to place your subject in dappled light because then you’ll have random spots of sunlight on your subject. The most important thing is EVEN lighting on your subject.
Below I will show you some different examples of lighting situations at the exact same time of day.
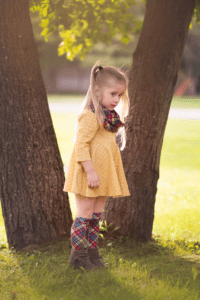
(Straight out of camera) Direct Sunlight, dappled light.
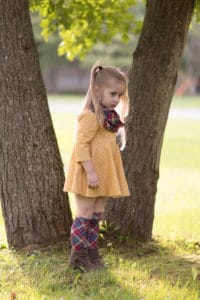
Opposite side of the tree, even lighting.
Indoor
Indoor photos tend to be the hardest for people, me included! Lighting in our homes typically has a yellow hue and will throw off our white balance. We will end up with unnaturally “warm” photos. You will want to use natural light as much as possible. The best way to do this is to use a large window or open your door to let some light in.
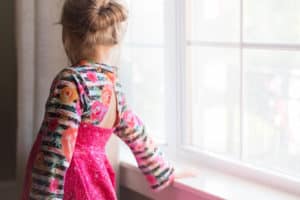
Indoor by a large window
Background/props
Photos with an uncluttered background look best. For example, if you are shooting outside and there is a picnic table behind your subject, your photo will look cluttered and it will take away from your subject. Try to get move any distractions out of the photo.
Props can be fun, but I live by the motto “Less is more”. This isn’t to say that you can never use props, I’ve seen some really amazing photos with props involved. Some fun props that not only look great but are functional as well:
- A basket/large bucket – If you are photographing a young child that doesn’t yet sit on their own a basket is a great prop to help keep them “propped up”. ALWAYS ALWAYS ALWAYS be sure there is someone there to spot the child should they topple over. One tip that I HIGHLY recommend is that you weigh down the basket/bucket. Do you have a weight that goes on the end of a barbell? Place that in the bottom and then add some blankets over top for baby to sit on. The weight will help keep the basket/bucket from tipping over. Add some fake (or real) flowers around the basket and you have a gorgeous prop that not only adds a fun element but also adds some function!
- A rocking chair – When I first started testing for SLPCo my daughter was only a few months old. She could not sit up and you can only get so many laying down photos without looking repetitive. We have a wicker chair in our sun room that I would prop her up on, she would sit up in the corner of the chair (with daddy right near by just in case!) and we got some adorable photos this way! This also works for older kids as well, get creative!

Using a bench as a prop
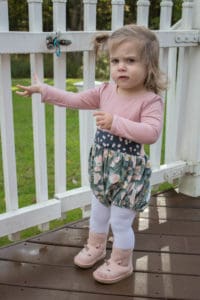
Distracting background, ugly lock on railing right next to her head
Editing
Editing can make or break a photograph. A lot of times I will see a photo that has been very clearly edited with an app on a smart phone. This is not a terrible thing, and no one will chastise you for doing so. However, if you want professional, quality looking photographs you will want to use a camera and edit on a computer. My favorite editing programs to use are Adobe Lightroom and Adobe Photoshop. These programs are available in a $10/month creative cloud membership. There are also some free editing programs out there but I do not have any experience with them. Picmonkey is an example of one that I have heard good things about.
Straight out of camera
Edited using Photoshop
I hope you’ve enjoyed these tips that I have compiled for you! I’d love to know what your favorite tips for better photos are! Head over to the Facebook group and let me know!
Until next time,